AnyDeskリモートデスクトップで画面共有する方法


Easy and convenient AnyDesk desktop sharing
Screen sharing allows you to see each other’s screens virtually, in real time, anywhere in the world, looking over each other’s shoulders, without sending screenshots or screen recordings of each other. Why do you need screen sharing? How many times in the office have you walked over to a colleague’s workspace and discussed what you see on the screen? Why should we do this?
What is screen sharing?
You may be shown how to use new tools implemented in IT. Have you and your colleagues ever projected a screen onto the wall during a meeting? At some point, your colleague may want you to review your work and guide them in real time, rather than sending you the files ahead of time.
With more people working from home, the opportunities for this are increasing. Luckily, all of these cases can be virtually replicated using screen sharing tools such as remote desktop solutions. This step-by-step guide will show you simple steps to easily share your screen with AnyDesk .
How to share screen on AnyDesk
To share your Windows screen with others using AnyDesk, you need to:
1. Download and start AnyDesk
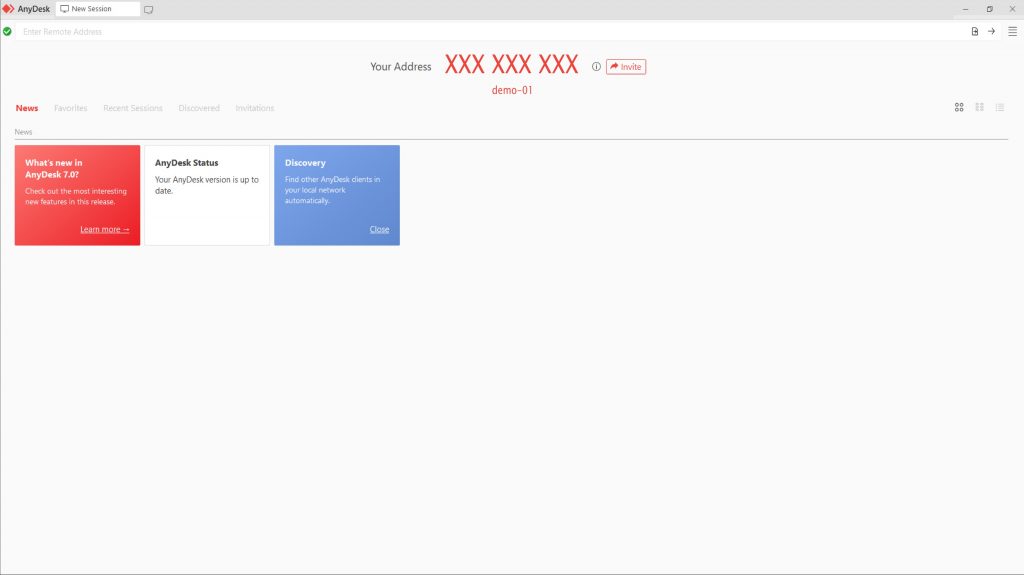
First, download AnyDesk . You can download it for free for personal use or purchase an affordable and scalable license for professional use of AnyDesk. In any case, as soon as you open AnyDesk for the first time, you will be presented with a home screen displaying your AnyDesk ID and alias for connecting to your device. Additionally, you will see an Invite button next to your ID.

2. Share AnyDesk ID or send session invitations
To allow incoming connections to your device through AnyDesk, you have the following options:
Option 1: Share your AnyDesk ID directly with the person you want to share your screen with so they can connect to your device. Only share your ID with people you know and trust. Right-click the ID and select Invite by Email to generate an email containing the ID/alias. Now all you have to do is send this email to the person you want to share your screen with.
After a session, other users can see your identity on the address tile in the recent sessions section of the AnyDesk home screen. The next time you share your screen, simply double-click the tile to send a new connection request to your device.
Option 2: If you know the AnyDesk ID of the person you want to share your screen with, enter the ID directly in the pop-up window that appears after pressing the [Invite] button. After sending the request, the other party will receive an acceptable session invitation to connect to your device.
この招待の送信者は、ポップアップウィンドウで希望する一連のアクセス権限を選択することで、次のセッションのアクセス権限を事前に定義できます。選択した権限は、招待を受け入れる人があなたのデバイスに接続すると、付与されます。

3. セッションのリクエストを送信する
相手があなたのセッション招待を受け入れると、相手らの着信接続をあなたが再度受け入れなくても、あなたのデバイスにアクセスできるようになります。前の手順で、付与する権限の範囲は既に定義しました。 セキュリティ上の理由により、セッションへの招待の有効期限は2分間のみです。したがって、招待を送信するときは、相手が2分以内にデバイスに接続するようにしてください。 AnyDeskホーム画面の招待セクションに、送受信されたセッション招待の履歴を表示されます。そこには、未処理のリクエストをいつでもキャンセルできるオプションがあります。
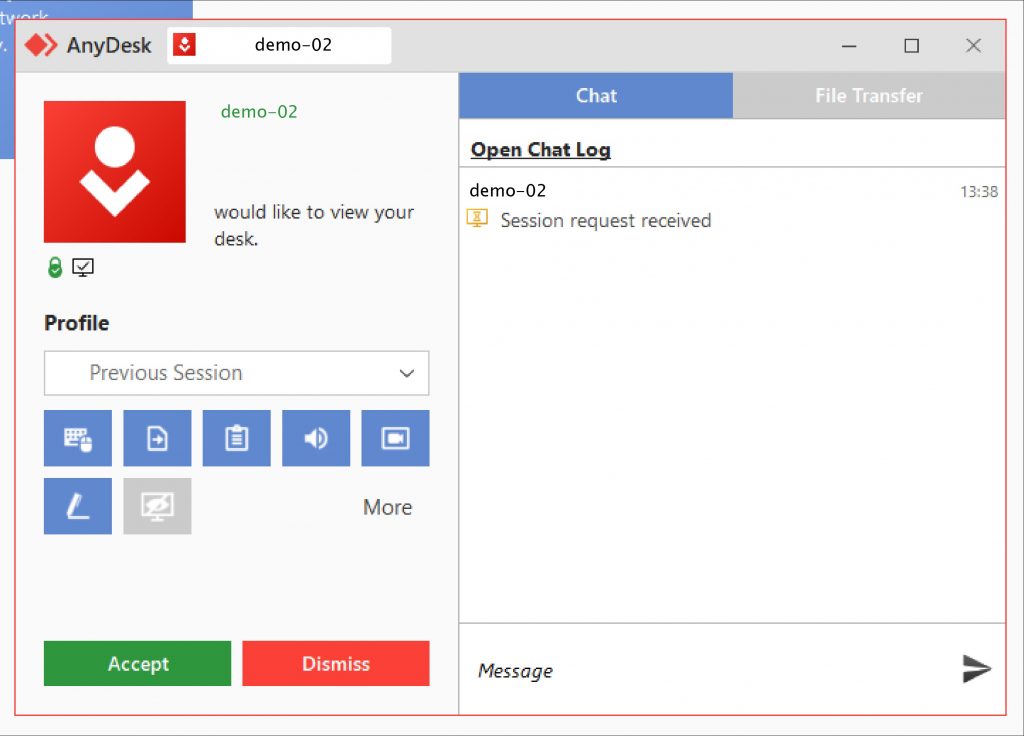
オプション1で説明したように、招待なしにあなたのデバイスにアクセスする場合は、セッションリクエストを直接受け取ります。着信リクエストを受け入れる前に、付与する権限を変更することができます。[承認]ボタンを押したときのみ、接続が確立されます。

着信セッションリクエストのウィンドウを受け入れる
セッションのセキュリティに関するその他のヒント
リモートデスクトップセッションが単に画面共有を目的としているなら、すべての 権限とは言いませんが、大部分のチェックは外しておくことをおすすめします。これにより、相手があなたのデスクトップを操作できなくなります。これは、マウスとキーボードの使用を拒否し、クリップボードとファイルマネージャーを使用できないようにし、オンスクリーンホワイトボードを無効化するということです。権限は、いわゆる セッション権限プロファイルを使用して定義することもできます。画面のパッシブビューのみを許可する画面共有プロファイルなどの事前設定プロファイルを使用するか、個別プロファイルを独自に作成できます。
もちろん、チャット機能は引き続き有効化されているので、相手に質問したいとき、明確化したいことがあるときに、コミュニケーションをとることができます。セッションの記録を許可しておくと、画面共有を介してチュートリアルをホストする際などに役立ちます。これにより、相手はいつでもセッションを再視聴できます。

これらの許可はセッションの前にセキュリティ設定で設定でき、セッション実行中にいつでも変更できます。相手があなたの画面上で何かを視覚化したい場合は、オンスクリーンホワイトボードの使用を許可することで可能となります。
AnyDeskで他にできることは?
プレゼンテーションが終了したら、[承認]ウィンドウでセッションをキャンセルすることで、あなたのデバイスに接続したユーザーを切断できます。お分かりのように、AnyDeskは、接続の不安定、遅れ、安全性を心配することなく画面共有するための、簡単な方法です。
しかし、AnyDeskの機能はこれだけではありません。単純な画面共有から、複雑なIT管理タスクまで、AnyDeskにはあらゆるニーズに対応できる機能があります。高い セキュリティ基準も備えています。AnyDeskをお使いのデバイスダウンロードして、今すぐ使い始めましょう!
ニュースやヒントなどの情報をお届けします