How To Access Remote Files Locally with AnyDesk Using TCP Tunneling

Mount Remote Folders Locally With an AnyDesk TCP Tunnel
For a software developer, Remote Work can be a challenge. Being able to access a source code locally can often make things faster and more comfortable. With AnyDesk you can set up a TCP tunnel connection which allows you to access files on a remote device locally without having to download them on your local machine.
In this article I will show you how to mount a remote folder locally using TCP Tunneling with AnyDesk for Linux but it’s also available for Windows and macOS devices. This solution is much more CPU and traffic-efficient than the classical Remote Desktop Access.
Setting Up a Direct Tunnel Connection With SSH
SSH, like any other TCP connection, is only possible when the host you are connecting to is visible from your local computer. This happens, for example, if the host is on the same local network or has an external IP address. Usually this is not the case when you are connecting to your office PC from home.
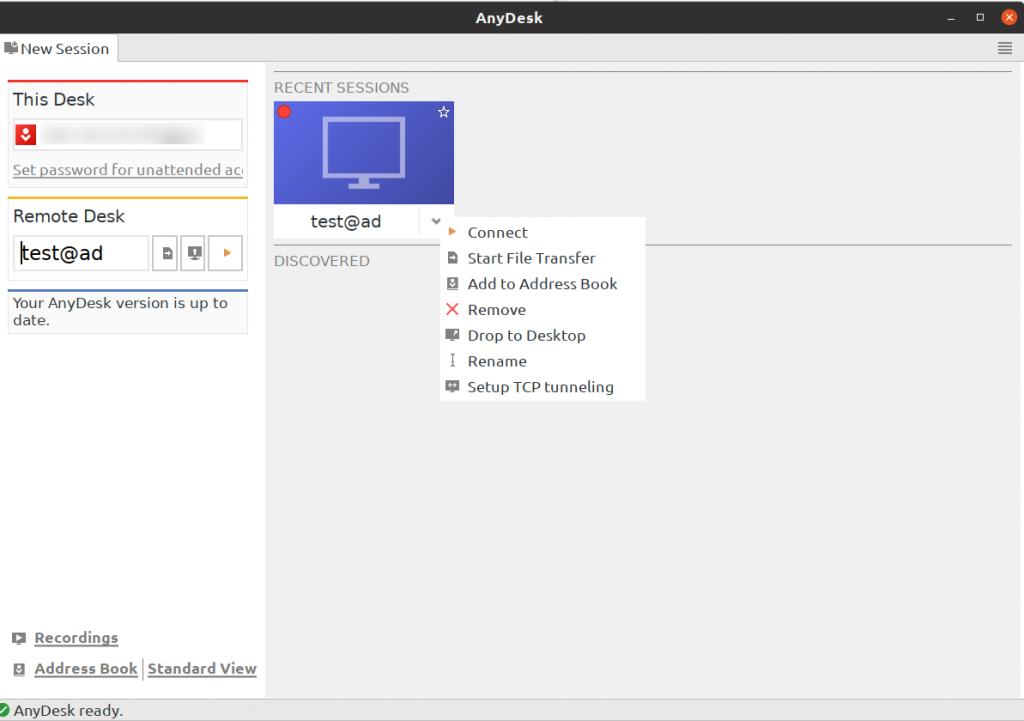
With AnyDesk, however, one can connect to any computer regardless of any firewalls or NATs. Using the TCP Tunneling Feature of AnyDesk you can set up a tunnel to the remote computer and use SSH almost as if the two computers were in the same network. To do so, open the TCP tunneling settings from the context menu of the address tile:

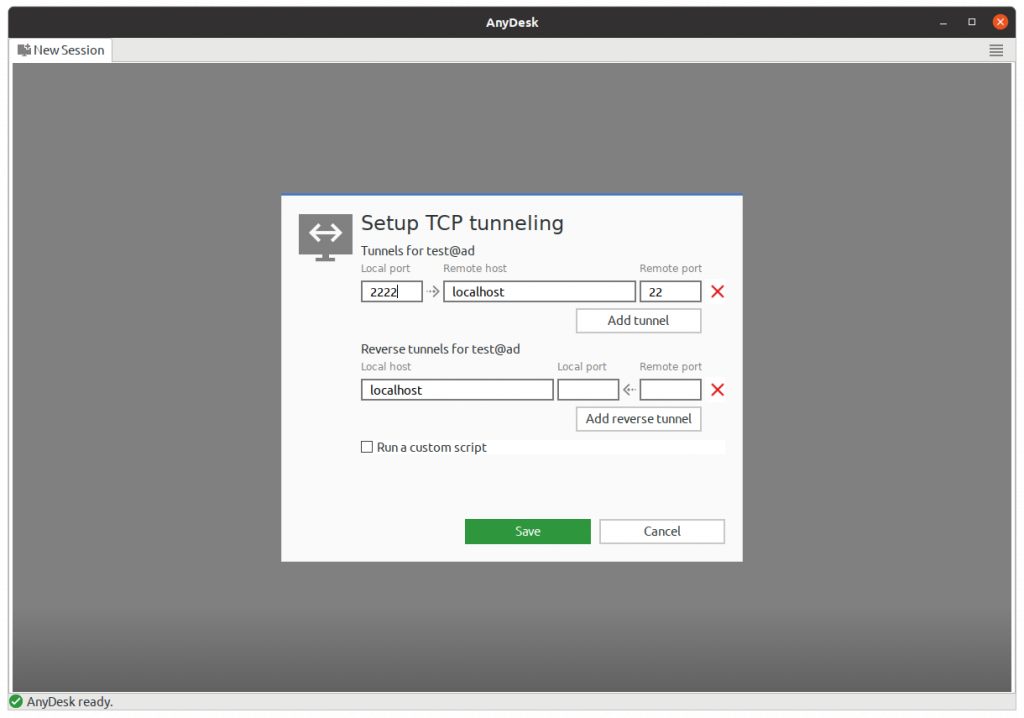
In the dialog box, you’ll see the settings for direct and reverse tunnels. For our purpose, we select the direct tunnels. To forward the SSH port we need to add a rule into the setup window:

In the example above, we are forwarding the TCP port 22 of the remote machine (the remote port used by SSH) to the local port 2222. The exact port number doesn’t matter, we use 2222 as an example in this case.
This tunnel will be activated as soon as you connect to the corresponding AnyDesk ID. The type of connection doesn’t matter, the tunnel will work in both normal and file transfer modes. I use the file transfer mode to save traffic and CPU time.
Testing the SSH Connection
Now, after you have created the tunneling rule and connected to the remote side, it’s time to test the SSH connection. Run the following in your terminal:
ssh -p 2222 <username>@localhost
Substitute <username> with the username on your office PC. If you’ve done everything correctly, you will be asked for your password on the remote machine. After you check the access, you may close the remote shell, as it is no longer needed.
The next step will be to copy your local SSH keys to the office PC, so the office machine will allow you access without a password. Generate your SSH keys if you haven’t done so already with the following command:
ssh-keygen
Now copy the keys to the remote machine:
ssh-copy-id -p 2222 <username>@localhost
After this step you should be able to connect to SSH without a password.
Ready to Access the Remote Folder
After the initial setup is done, let’s set up the work environment. The trick here is to mount the remote folder locally using SSHFS. If you haven’t got SSHFS installed, on DEB-based distributions it can simply be done via apt:
sudo apt install sshfs
Now create a folder locally where you want your remote folder to be mounted. I recommend both folders having the exact same path. In this example let’s assume your work folder is:
/home/johndoe/work
Now let’s mount it locally:
sshfs -p 2222 johndoe@localhost:/home/johndoe/work /home/johndoe/work
If everything has been set up correctly, you will now have your remote files mounted locally. Don’t forget that you need an active AnyDesk connection for the TCP tunnel to work. After you close the AnyDesk connection, the folder will be instantly unmounted.
Automating Commands
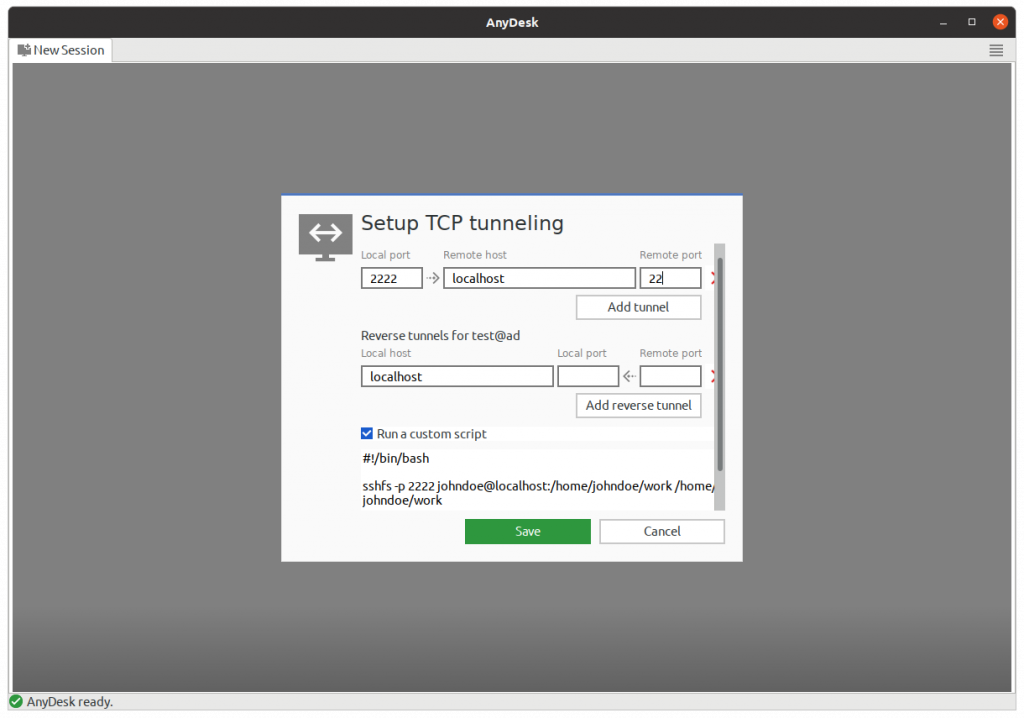
Up until now, we had to execute commands by hand to access remote data. AnyDesk allows you to automate this process. As before, open the TCP tunnel setting from the context menu. On the very bottom of the dialog, you will see the checkbox: Run a custom script. Set a checkmark and the script will be executed locally every time the TCP tunnels are established. Let’s create a script to automatically mount our work folder.

Now click on Save and connect. The folder should mount automatically after you connect and, in return, unmount on disconnection. Your favorite IDE or text editor will work with the mounted folder just fine.
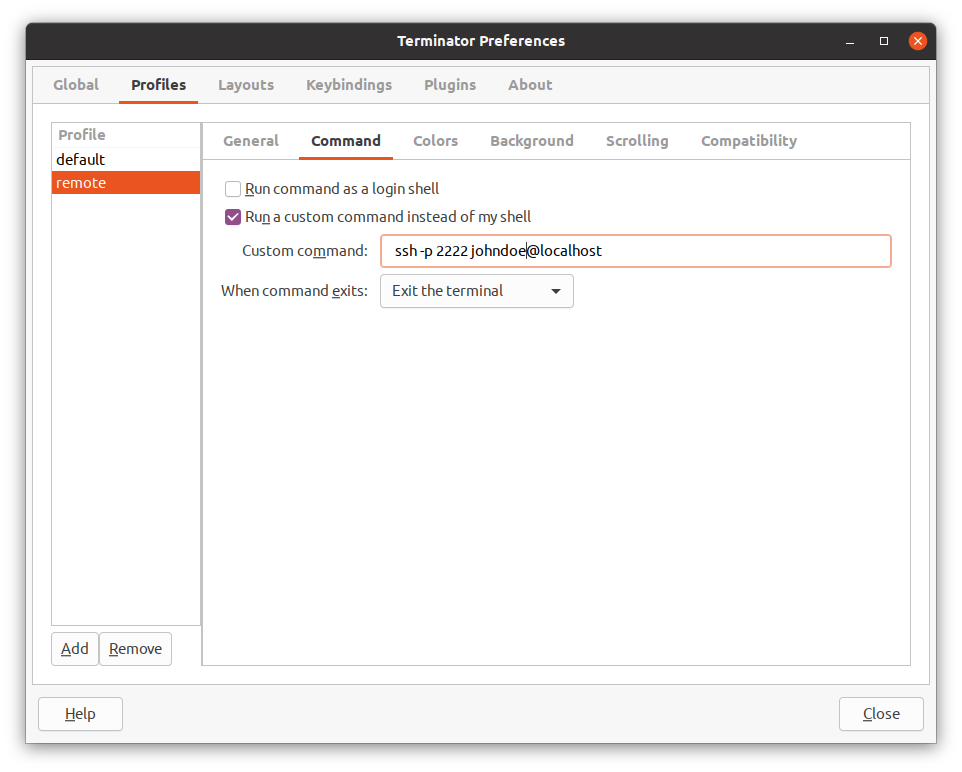
There are many more possibilities for automation. You can add a line to the script to open the remote shell automatically, for instance. I use Terminator as my favorite terminal emulator. There you can create a custom profile which will open a remote shell on start:

Just add the following command to the script and you will have your remote shell ready as soon as you’re connected:
terminator -p remote
Accessing Internal Web Resources
Usually, it’s necessary to access some internal web resources, for example issue trackers, which are only available directly from the office. With SSH one can easily set up a SOCKS5 proxy:
ssh -D 7000 -N -p 2222 johndoe@localhost
The proxy will be active on port 7000 of localhost. If you add this line to the AnyDesk TCP tunnel script, the proxy will be set up automatically. To use it, I recommend the browser extension named FoxyProxy to have custom proxy settings depending on the URL patterns.
Conclusion
As an alternative to the classical Remote Desktop Access, you can use AnyDesk for Linux to access remote files locally by mounting them with SSHFS. This facilitates Remote Work tremendously, especially if you need to work on remote files or source codes locally.
AnyDesk for Linux is easy to use and establishes continuous connections to any operating system. Our Remote Desktop Software works with a huge range of Linux distributions, including Ubuntu, Red Hat, and openSUSE. Updates are always free, whatever type of license you own.
Interested in getting started with AnyDesk for Linux? Choose your Linux distribution now and follow the package manager for a quick and easy installation.
Sign up for news, tips and more